When shooting in less-than-ideal conditions, you may encounter grainy images with extremely fragmented textures. If you choose to print your ‘dotty’ photo in a larger size, all of these flaws will be magnified. Although grain can be a lovely and fashionable accent in older photographs, it can also be a sign of poor quality and execution in other situations. These colorful dots are known as digital noise in professional photography, and getting rid of them may be a real nuisance.
To fix grainy pictures, increase the brightness and decrease the contrast slightly. Use image noise reduction software or apps to reduce grain. Avoid over-sharpening. Shoot in good lighting conditions and use lower ISO settings. Consider using a tripod to prevent camera shake.
With the help of various image editors, you may restore your images to their former glory. Hang out till the end to Fix Grainy Photos using the methods we gathered for you. Check this article if you want to stitch pictures.
See also: Top 7 Free Raw Image Editor Software | Edit Raw Images Free
Table of Contents
What Causes Grainy Photos?
Before you can find out how to fix grainy photos, you must first discover why it is grainy. The answer can be found in a single camera setting known as ISO. In a word, the ISO setting determines how sensitive your camera’s sensor is to light. The higher the sensitivity, the brighter your image will be.

After you’ve chosen your shutter speed and aperture, the ISO setting is supposed to help you balance your exposure. It doesn’t provide your shot with any artistic effects like the shutter (freezing/blurring motion) or aperture (depth of field). As a result, you should usually choose the ISO setting last when selecting your camera settings. You can compare similar shots and find the low-quality grainy ones with the help of Duplicate Photo Cleaner.
That isn’t to suggest that the ISO level isn’t important; it is for each and every photo you take. Without it, capturing the appropriate exposure while maintaining creative control over your photograph would be difficult. Although incredibly beneficial, the ISO setting has several significant downsides when the sensitivity is increased. This flaw manifests itself in the form of grainy photos.
How Can You Fix Grainy Photos in 2024?
Photographers can be divided into two groups: those who enjoy editing images and those who despise it.

When it comes to correcting grainy images, it doesn’t matter which side you’re on. This is due to the fact that there are a few easy solutions to avoid blurry images.
Increase the Brightness of Your Exposure
The more grain apparent in your shot, especially in shaded regions, the darker it is because the grain becomes more obvious when there isn’t enough brightness to ‘override’ it. Because of this, even with a low ISO, you may notice extra grain in the shadows of your image.
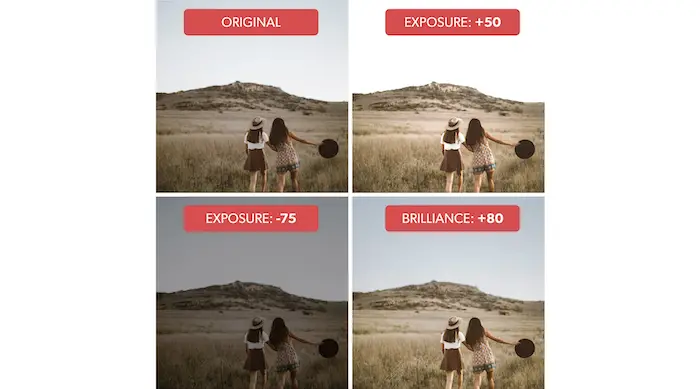
You can brighten your exposure by altering your shutter speed and aperture to assist in remedying this problem. You may brighten the shadows in your image and restore more detail in certain spots this way.
Look at your camera’s histogram before you go crazy with boosting your exposure. Before you take the picture, check the histogram to see whether there are any blown-out highlights. To avoid the loss of information in your photograph, make sure everything is exposed appropriately.
With the help of various image editors, you may restore your images to their former glory. If you’re looking for a vast collection of high-quality stock photos to enhance your projects, consider exploring DepositPhotos.
By Reducing the ISO Setting
This may appear self-evident but abide with me. When they’re in a hurry, many photographers often use auto ISO or set their ISO too high. Think about your ISO settings the next time you take a photo.

You can often compensate for a stop or two in shutter speed and aperture and still achieve the same artistic outcome. It’s a win-win situation if you can compensate your camera settings while still preserving your artistic aims (e.g., motion blur and depth of field). One of the simplest ways to fix grainy photos without photo editing is to lower your ISO.
See also: How To Download Backtrack 5 R3 ISO For Free? [2024]
By Utilizing the Lighting Situation
The most prevalent cause of grain in photographs is poor illumination. Place the object in front of the light source or the light source in front of the object for better results. If changing the position of the light source or item isn’t an option, play about with the shooting angles.

By Avoiding Digital Zoom
Another reason for grainy photographs is due to digital zoom. If you need to zoom in on an image, first click it normally, then crop the region you want to zoom in on.

Long Exposures Should be Handled Carefully
Long exposures, believe it or not, can result in additional grain in your images. Your camera can produce discolored pixels and grit, especially when using extremely short shutter speeds. Depending on your camera body, the time it takes for things to happen will vary.

Using a range of slow shutters, you can see how far you can push your long exposures. After a particular amount of time, you’ll notice a noticeable rise in noise as you extend the exposure time.
This isn’t to imply you shouldn’t shoot images with long exposures. It’s only to remind you to think about whether you really need to shoot that 30-minute exposure.
By Shooting in RAW Mode
RAW files, if you’re unfamiliar, are uncompressed image files with a far greater bit rate than JPEG files. In layman’s terms, you can post-process a RAW image far further than a JPEG file.

Although shooting in RAW won’t fix grainy photographs on its own, it does give you additional options in post-production. You can increase your shadows and perform grain reduction tweaks without fear of artifacts with this file type.
FAQ
How can I fix grainy photos without Photos?
If you still don't like the Photoshop noise reduction you see, open the Shake reduction tool by clicking on Filter > Sharpen and selecting Shake Reduction. Use this to see if you can also remove blur caused by a slight shake when you took the photo enough for a sharper image.
Is there an app to repair grainy pictures?
Instasize is a smartphone editing app that can sharpen your muddied photographs via a simple slider interface. Just open your photo, go to settings, go to Sharpness, and adjust the bar as necessary.
Why are my photos grainy at low ISO?
If you are operating on a relatively low ISO but still seeing grain in your photos, you aren't getting your exposure correct in the camera. Under-exposing in-camera is the amplest reason for including extreme noise in your images, even at moderately lower ISO numbers.
Conclusion
A grainy photo isn’t the end of the world, though, and there is a comprehensive list of software and applications that can help you Fix Grainy Photos on your phone. For all photographers, learning how to correct grainy images is a must-have skill. While the grainy look may have an impact on your shot, you can still apply all of the techniques and ways discussed in this article. Fixing grainy images, whether in-camera or in post-production, is critical to retaining a higher-quality image.
Hope you were able to remove all the grains on your photos successfully. You will end up with a high-resolution noise-less picture. Feel free to reach out if there’s any problem with our method. Using these tools, organize your pictures on your computer.
Thank you for reading!